How to Measure a Drawstring Pouch: Size Guide for Brands
How to Measure a Drawstring Pouch: Quick Overview
If you’re sourcing pouches for the first time, getting the measurements right matters more than it might seem. A pouch that’s half an inch too small won’t close over your product, and one that’s too large makes jewelry or gifts shift around and look sloppy in photos.
Measuring a pouch comes down to three numbers: width, height, and gusset depth if the pouch has one. Add drawstring length as a fourth if you’re specifying custom cord, and that’s really all a supplier needs to quote your order accurately. Once you know how to measure a drawstring pouch correctly, comparing samples from different suppliers gets a lot easier too.
This guide walks through exactly how to take each measurement, what tools you need, and how to avoid the mistakes that lead to a batch of pouches that don’t quite fit.
It’s a step that’s easy to rush past, especially when a supplier’s catalog already lists a handful of “standard” sizes that look close enough. But close enough on paper doesn’t always translate to a good fit in practice, and the cost of catching a sizing mistake after a full production run is much higher than the few minutes it takes to measure properly upfront.
Tools You Need to Measure a Drawstring Pouch Accurately
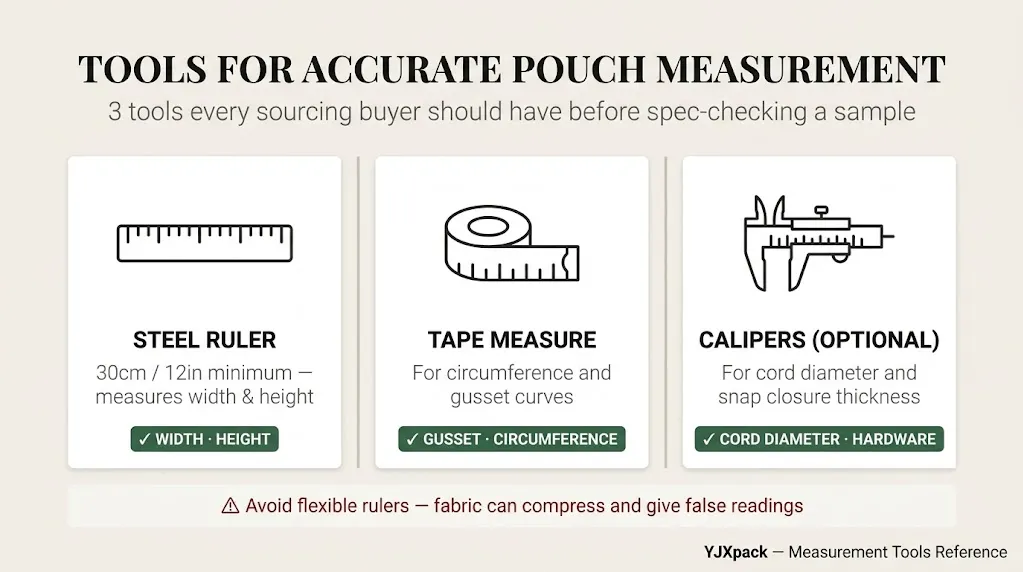
You don’t need anything specialized here, but a few basic tools make the process far more reliable than eyeballing it.
A flat steel ruler or a flexible tailor’s tape measure both work well, though a rigid ruler tends to give more consistent readings on flat measurements like width and height. For gusset depth, a flexible tape wraps around curved edges more easily than a straight ruler can.
A notebook to record measurements as you go helps more than you’d think, especially when you’re comparing several sample pouches side by side. It’s easy to mix up numbers from memory once you’ve measured four or five samples in a row.
If you’re working from a finished sample pouch rather than a spec sheet, a pair of small scissors or a seam ripper can help you check internal seam allowances without damaging the sample, which matters if you need to send it back to a supplier for reference.
A protractor or angle guide isn’t strictly necessary for basic width and height, but it comes in handy if you’re working with a pouch that has an angled or curved top edge rather than a straight one. Measuring an angled edge with just a straight ruler can introduce small errors that add up once you’re comparing multiple samples against each other.
Good lighting matters more than people expect, too. Measuring on a dim desk or under yellow indoor lighting makes it surprisingly easy to misread small ruler markings, especially on darker fabric where the ruler’s edge can blend into the material. A well-lit table, ideally near a window or under a bright desk lamp, cuts down on that kind of avoidable error.
How to Measure Width and Height
Width and height are the two measurements every supplier will ask for first, so it’s worth getting comfortable with the basics. Getting your drawstring bag dimensions right at this stage saves a lot of back-and-forth later in the sourcing process.
Lay the pouch flat on a table, empty and unstretched. Measure the width straight across the widest point, usually just above the drawstring channel or at the base if the pouch flares slightly. Then measure the height from the bottom seam up to the top edge, not including the drawstring or any extra fabric that folds over above the channel.
Round to the nearest quarter inch or half centimeter, since fabric naturally has a little give and suppliers won’t hold you to a fraction of a millimeter anyway. Naturally, most standard listings use whole or half-unit increments for exactly this reason.
One detail that trips up first-time buyers: width measured flat isn’t the same as the pouch’s actual circumference when it’s stuffed full. A pouch measured at 4 inches flat can hold an item wider than 4 inches once it’s opened up, since the fabric has room to expand on both sides.
It also helps to measure the same pouch two or three times and take the most common reading, rather than trusting a single pass. Fabric can shift slightly on a table, and a ruler that’s even a few millimeters off-square gives a skewed number. This matters more on stretchier fabrics like velvet or microfiber, which compress more easily under a ruler’s edge than a stiffer cotton canvas would.
How to Measure Gusset Depth
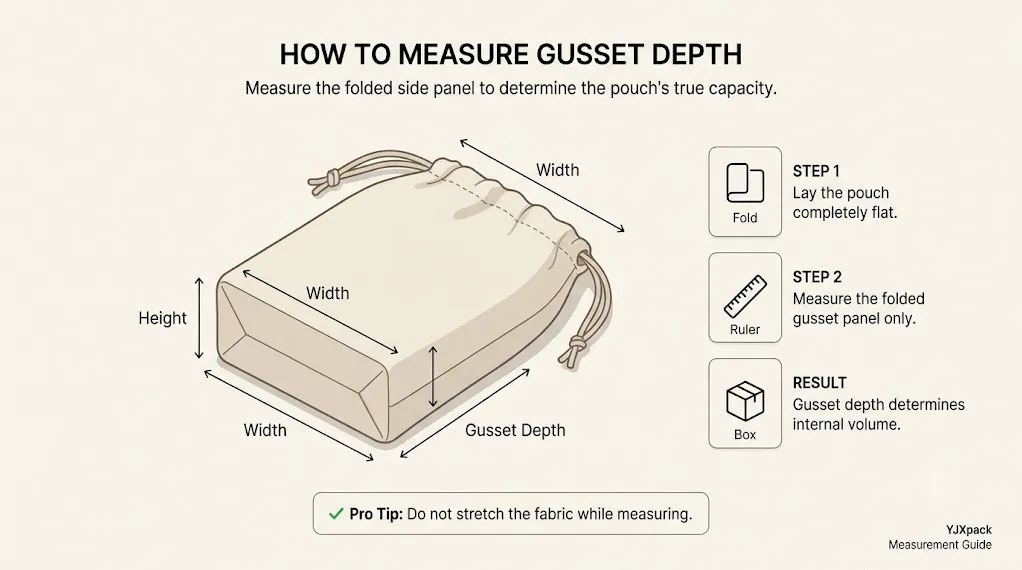
Not every pouch has a gusset, but if yours does, this measurement changes how much the bag can actually hold. A gusset depth measurement takes just a few extra seconds but makes a real difference in how accurately you can estimate capacity.
A gusset is the folded side panel that lets a pouch expand outward, usually found on boxed-bottom or flat-bottom styles. Specifically, to measure it, lay the pouch flat and measure the width of the folded panel at the base, from one folded edge to the other.
Gusset depth affects capacity more than width or height alone, since it determines how much the pouch can round out once something is placed inside. Two pouches with identical width and height measurements can hold noticeably different amounts if their gusset depths differ.
If you’re not sure whether your pouch has a gusset, check the bottom seam. A flat-bottom pouch will have a distinct fold or seam running perpendicular to the side seams, while a simple flat pouch will just have a straight seam across the bottom with no extra panel.
Gusseted pouches are worth the extra measurement step mainly when you’re packing something with real bulk, like a boxed watch or a bracelet with a clasp. For flatter items like a thin chain necklace or a gift card, gusset depth matters far less, and a simple flat pouch usually does the job just as well at a lower cost.
How to Measure Drawstring Length
Drawstring length is easy to overlook, but it affects both how the pouch closes and how it looks once tied.
Measure the cord itself, end to end, while it’s still threaded through the channel. A cord that’s too short won’t leave enough length to tie a secure knot or bow, while one that’s too long tends to hang awkwardly or get in the way during shipping.
As a rough guideline, drawstring length should run about two to three times the pouch’s width, which leaves enough slack to open the bag fully and still tie it closed with some cord to spare. Smaller pouches need proportionally less cord, while larger pouches need more to reach comfortably around a fuller shape.
If your supplier offers a choice of cord thickness, keep in mind that thicker cord takes up more room in the channel and effectively shortens the usable length compared to a thin cord of the same measured length.
It’s also worth checking how the cord ends are finished, since this affects both function and durability. A knotted end holds up well over repeated use, while a raw cut end tends to fray after a few months of handling. Beaded or capped ends look tidier and also work as a simple lock, keeping the pouch from slipping open during shipping without needing extra tape or packaging.
Standard Pouch Sizes by Use Case
If you’re not sure where to start, these general ranges cover most common packaging needs. Use this pouch size guide as a starting reference, then adjust based on your specific product.
| Use Case | Typical Width | Typical Height |
|---|---|---|
| Rings, earrings, small jewelry | 2.5–3.5 in | 3–4 in |
| Necklaces, bracelets | 4–5 in | 5–6 in |
| Watches, larger jewelry sets | 5–6 in | 6–8 in |
| Cosmetics, small gift items | 5–7 in | 7–9 in |
| Wedding favors, sachets | 3–4 in | 4–5 in |
These ranges are starting points, not hard rules. It’s always worth measuring your actual product first, then adding roughly half an inch of extra room on each dimension so the item goes in and out easily without straining the seams.
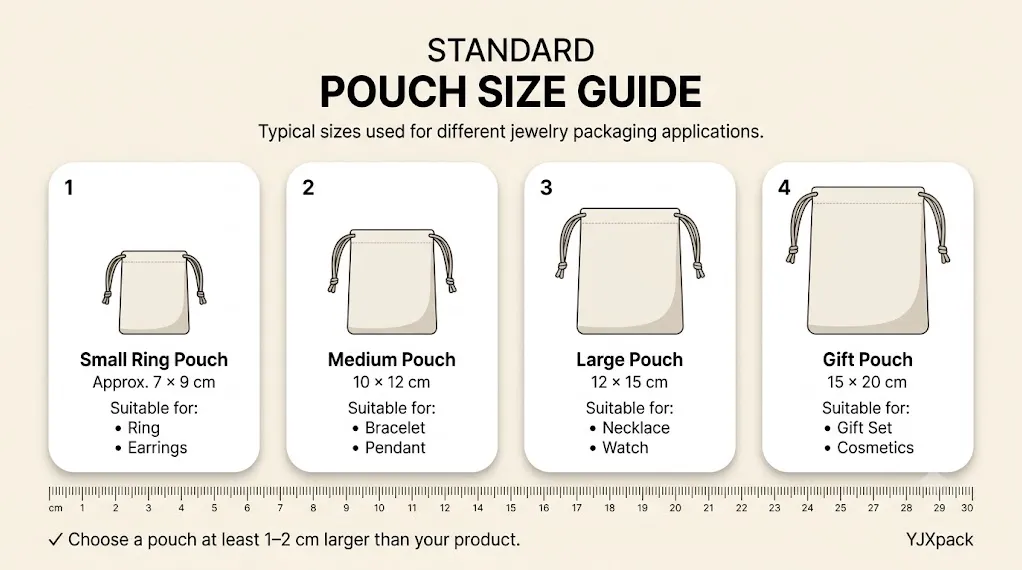
How to Convert Between cm and Inches for Sourcing
Since many factories work primarily in centimeters while a lot of Western retail listings use inches, conversion mistakes are one of the most common sourcing errors.
The basic conversion is simple: one inch equals 2.54 centimeters. So a 4 by 6 inch pouch works out to roughly 10 by 15 centimeters, and a 3 by 4 inch pouch comes out to about 7.5 by 10 centimeters.
Rather than doing the math in your head each time, it helps to write both units on your spec sheet from the start. This also protects against a common miscommunication where a buyer means inches, a factory assumes centimeters, and the resulting pouch comes out roughly two and a half times smaller than intended.
When in doubt, round measurements to whole or half centimeters when working with a Chinese factory, since that’s typically how their cutting patterns and machinery are calibrated. It keeps your spec sheet aligned with how the factory will actually produce the pouch.
A quick sanity check also helps catch conversion errors before they become expensive. If a “small jewelry pouch” comes out to 25 by 30 centimeters on your spec sheet, something has gone wrong, since that’s closer to a tote bag than a ring pouch. Running a rough mental estimate against the table of standard sizes below is often enough to catch an obvious unit mix-up before it reaches production.
How to Measure a Drawstring Pouch: Common Mistakes to Avoid
A handful of errors come up again and again, so it’s worth checking your own measurements against this list before finalizing an order.
Measuring a stuffed sample instead of an empty one. A pouch stretched by a sample product inside will read larger than its true flat dimensions, which throws off comparisons between different suppliers’ samples.
Forgetting to account for seam allowance. The usable interior space of a pouch is always a bit smaller than its outer measurements, since seams take up a small amount of room on every side.
Mixing up width and circumference. As mentioned earlier, a pouch’s flat width isn’t the same as how wide it can stretch once something is placed inside. Confusing the two leads to ordering pouches that seem too small on paper but actually fit fine, or vice versa.
Not measuring your actual product first. It sounds obvious, but plenty of buyers pick a “standard” size from a catalog without ever measuring the item that needs to fit inside it. A five-minute check with a ruler on your own product saves a much more expensive reorder later.
Rounding too aggressively on a tight fit. Rounding to the nearest half inch is usually fine, but if your product is a snug fit already, rounding down instead of up can be the difference between a pouch that closes properly and one that strains at the seams. When in doubt on a close call, round up rather than down.
How to Measure a Drawstring Pouch: Communicating Size to Your Supplier
Once you’ve got your measurements, presenting them clearly to a supplier avoids back-and-forth delays.
Give both width and height, in that order, followed by gusset depth if applicable, and specify the unit clearly every time rather than assuming it’s understood. A spec like “4 x 6 in (10 x 15 cm)” leaves no room for confusion, even across a language barrier.
If you’re ordering a custom size that doesn’t match a supplier’s standard catalog, ask whether it changes the minimum order quantity. Custom sizes sometimes carry a higher MOQ than a factory’s stock sizes, since it usually means cutting a brand-new pattern just for your order.
It’s also worth requesting a physical sample at your specified size before committing to a full production run, rather than approving based on a written spec alone. Even careful factories can misinterpret written measurements occasionally, and catching that on a single sample costs far less than catching it on a finished batch of a thousand units. If jewelry protection is part of your packaging plan, this GIA jewelry care guide is a useful reference for how pouch fit affects long-term protection.
Once your sizing is confirmed, our jewelry bags catalog shows standard sizes across materials if you’d rather start from an existing size than commission something custom. Common jewelry pouch sizes are listed alongside each material option, which makes comparison shopping easier. For fabric-specific sizing questions, the cotton bag collection lists exact dimensions for each standard option. When you’re ready to finalize a size for your order, yjxpack.com can confirm measurements against your specific product before production starts.
FAQs
What’s the standard size for a jewelry drawstring pouch?
Most jewelry pouches for rings and earrings run about 2.5 to 3.5 inches wide and 3 to 4 inches tall, while necklaces and bracelets typically need a slightly larger 4 to 5 inch pouch. The right size still depends on your specific item, so measuring your product first is the safest approach.
How much extra room should I add when sizing a pouch?
A good rule of thumb is adding about half an inch of extra room on each dimension beyond your product’s actual measurements. This gives enough space for the item to go in and out easily without straining the seams or drawstring channel.
Should I measure a pouch in inches or centimeters?
It depends on where your factory is based, though many buyers list both to avoid confusion. Chinese factories typically work in centimeters, so including both units on your spec sheet prevents a common source of sizing errors.
How do I measure gusset depth on a pouch?
Lay the pouch flat and measure the width of the folded side panel at the base, from one folded edge to the other. This measurement affects how much the pouch can expand once something is placed inside, beyond what width and height alone would suggest.
Why did my custom pouch order come out the wrong size?
The most common cause is a unit mismatch between inches and centimeters, or a spec sheet that didn’t clearly separate outer size from usable interior space. Requesting a physical sample at your specified size before full production catches this kind of error early.
Share This Story, Choose Your Platform!