A custom cable pouch project looks simple until the first sample arrives. The pouch may be the right width but too shallow for a coiled USB-C cable. The elastic loops may hold a slim charger but stretch out under a power brick. The zipper may close smoothly when empty yet jam when the pouch is packed with three cables and two adapters. These are not quality failures — they are specification gaps that were never defined before sampling began.
This guide walks procurement teams through the four decisions that shape every custom cable pouch order: cable and accessory dimensions, internal compartment layout, zipper and closure selection, and the choice between a standalone pouch and a multi-piece tech kit. Each section frames a question that must be answered before a sample request is meaningful.
> Scope note: This guide covers selection logic and the specification questions a buyer should resolve. Material availability, construction methods, artwork limits, MOQ, sampling fees, pricing, lead time and documentation must be confirmed against the final brief during quotation.
—
Quick Summary: Turn Cable Storage Needs into a Confirmable Specification
A custom cable pouch keeps cables, chargers, adapters and small tech accessories organized, protected and brand-presentable. Before contacting any supplier, prepare answers to these questions:
- What goes inside? List every cable type, charger, adapter and accessory the pouch must hold, with measured dimensions.
- How will items be separated? Define the number of compartments, their type (pocket, loop, divider, mesh panel) and the load each must handle.
- What closure does the use case require? Choose between zipper types, flap closures or hybrid designs based on access frequency and security.
- Is the deliverable a single pouch or a bundled kit? Decide whether the final product is one cable organizer pouch or a set of coordinated pieces sold or gifted together.
- Which branding, material and finish details affect cost? Identify the variables that change the unit price so the quote request includes them upfront.
—
What Cable Sizes and Accessory Types Must the Pouch Accommodate?
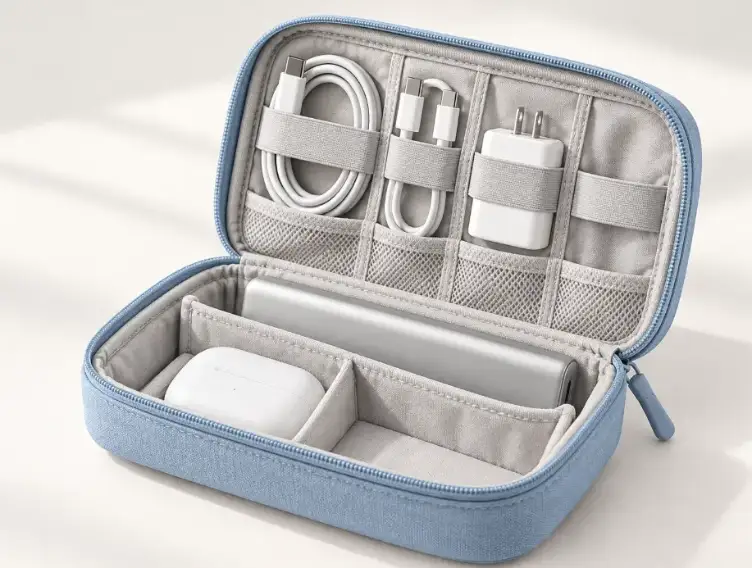
One frequent mistake in cable pouch procurement is treating “cables” as a generic category. A tightly coiled cable, a braided USB-C cable with a thick connector head and a laptop charger brick can each occupy very different volumes. If the spec sheet says only “cable pouch,” the factory may quote a generic mid-size format and the buyer may discover the mismatch at sample stage — or later.
Build a contents inventory first
Before defining the pouch, define the contents. A practical inventory should include:
- Cable types: USB-C, Lightning, micro-USB, HDMI, Ethernet, audio cables. Note the length, connector size and stiffness of each.
- Chargers and power adapters: Wall chargers (single-port or multi-port), laptop power bricks, wireless charging pads.
- Small accessories: Earbuds or earbud cases, SIM-card tools, SD cards, USB flash drives, dongles, cable ties.
- Accessories with irregular shapes: Travel adapters with folding prongs, multi-port USB hubs, portable power banks.
For each item, record three measurements:
- Folded or coiled dimensions — the footprint of the item as it will actually sit inside the pouch.
- Connector head height — the widest point of the plug or housing, because this determines the depth of pockets and the clearance needed.
- Weight — heavier items like power bricks affect fabric choice and stitching reinforcement.
Group contents by pouch type
Not every item belongs in the same pouch. Most branded cable pouch projects fall into one of three use profiles:
| Use Profile | Typical Contents | Rough Footprint |
|---|---|---|
| Minimal daily carry | 1–2 cables, earbuds, one charger | Small flat pouch |
| Work travel kit | 3–5 cables, laptop charger, adapter, USB hub | Medium structured pouch |
| Full tech kit (gift or retail) | Multiple cables, charger, power bank, earbuds, card reader | Large pouch or multi-pouch set |
The use profile determines not just overall pouch size but also the number and type of internal compartments required. Deciding the use profile early prevents the common problem of designing one pouch that tries to serve all three purposes and fits none of them well.
Connector bulk matters more than cable length
A frequent underestimation is connector bulk. When two or three cables sit side by side in elastic loops, connector heads can stack and create a lump that prevents the pouch from closing flat. If the pouch is intended to sit inside a laptop bag or branded box, account for this added thickness in the overall depth specification.
Decision: Finalize the contents inventory and measure every item in its packed state before setting pouch dimensions. Share the inventory with the supplier — it is far more useful than a target size alone.
—
Compartment Planning: Balance Organization, Capacity and Manufacturing Risk
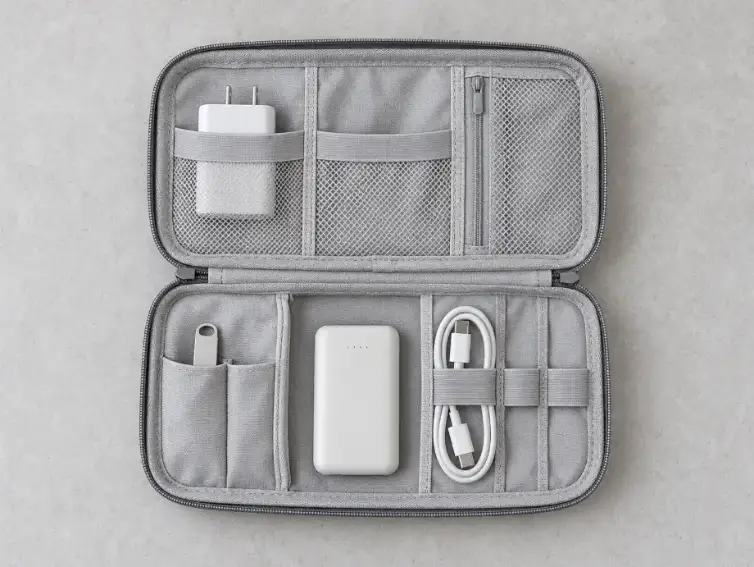
Compartments turn a simple pouch into a custom cable organizer pouch. They also add cost, production complexity and potential failure points. Every additional pocket, divider or elastic loop is a sewing step, a material join and a place where stitching quality must be inspected. The right number of compartments is the minimum needed to keep the contents organized and protected — not the maximum that can be crammed into the available space.
Common compartment types for cable pouches
- Elastic loops: Sewn bands of elastic that hold individual cables or pens in place. Effective for slim items; can stretch and lose tension over time if the elastic weight is too light for the item.
- Mesh pockets: Zippered or open mesh panels, usually on the inside of a clamshell (book-style) pouch. Allow visibility of contents. Mesh denier and stretch properties must match the item weight.
- Fabric divider panels: Solid fabric walls that separate the interior into two or three zones. Useful for isolating a heavy charger from lighter cables.
- Padded slip pockets: Lined pockets with light padding for items that scratch easily, such as a portable hard drive or power bank with a glossy finish.
- Zippered inner pocket: A small zip compartment inside the main cavity for SIM cards, SD cards, USB drives or other items that could fall out during opening.
How compartment count affects manufacturing
Adding compartments changes the production process in specific ways buyers should understand:
- More seams = more sewing time per unit, which raises the unit cost.
- Tighter tolerances = higher rejection risk if elastic loop spacing or pocket depth is off by even a few millimeters.
- Thicker cross-sections = difficulty closing the zipper if the compartmented side pushes the packed height beyond the zipper’s range.
- More materials = mesh, elastic, lining fabric and binding tape may each need separate sourcing and color matching.
A pouch with two mesh pockets and four elastic loops is a different manufacturing proposition from a simple single-cavity zip pouch. The factory needs to know the exact compartment layout to quote accurately.
Avoid the “over-organized” trap
Retail-ready cable pouches sometimes include a dedicated slot for every single accessory. This looks impressive in product photography but creates a real problem: if the end user’s cables or charger are even slightly different in size from the ones the pouch was designed around, the pouch feels wrong. For branded cable pouches sold with a specific kit of accessories, tight compartment design works. For pouches sold separately or used across product generations, a slightly more flexible layout — fewer fixed loops, one or two adjustable pockets — lasts longer and generates fewer complaints.
Decision: Define each compartment’s purpose, the item it holds, the retention method (elastic, zipper, flap) and the acceptable tolerance. Include this layout in a flat sketch shared with the supplier alongside the contents inventory.
—
Which Zipper and Closure Details Suit the Intended Use?
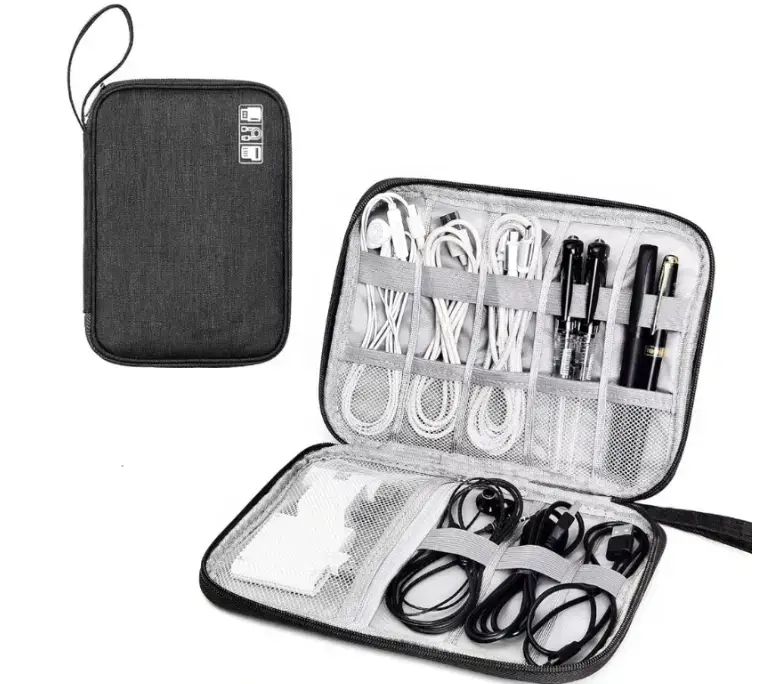
The closure is the most-used moving part on a custom cable pouch. It opens and closes repeatedly, sometimes several times a day for a work-travel pouch. The wrong zipper can snag on mesh pockets, jam when the pouch is overpacked, or corrode if the pouch travels through humid environments. The right closure depends on three factors: access frequency, security level and aesthetic fit with the brand.
Zipper types commonly used in cable pouches
- Nylon coil zippers: Lightweight, flexible and smooth in use. A common option for thin to mid-weight fabric pouches. Available in a wide range of colors. Teeth are formed from a continuous coil, so they flex with the fabric.
- Metal zippers: Brass, nickel or antique-finish teeth. Heavier, more premium feel. Suitable for thicker fabrics like canvas or heavy polyester. The slider action is stiffer, which can be a positive (security feel) or a negative (difficult one-handed opening).
- Molded plastic (vislon) zippers: Individual plastic teeth molded onto the tape. Often used in outdoor and rugged tech accessories. Depending on the components and use conditions, they can be a practical alternative to metal in humid environments.
- Water-resistant zippers: Coated or laminated zipper tape designed to reduce moisture ingress. Relevant if the pouch will be marketed as a travel or outdoor tech organizer.
Beyond the zipper: alternative closures
Not every custom electronics pouch needs a zipper. Alternative closures include:
- Wrap-around elastic band: A simple elastic strap that wraps around the folded pouch. No moving parts, low cost, but offers less security.
- Snap-button flap: A fabric flap with a magnetic or mechanical snap. Works for slim pouches holding one or two cables.
- Hook-and-loop (Velcro-type): Easy access but can attract lint and may snag on delicate cables or earbuds. Noise when opening can be a drawback for premium positioning.
- Roll-up with tie or buckle: A tool-roll format where the pouch unrolls to reveal loops and pockets, then rolls up and fastens with a cord or strap buckle. Good for larger sets of cables and tools.
Zipper specification details to confirm
When specifying a zipper for a custom cable pouch, the following details should be confirmed on the sample:
- Zipper gauge (size): #3 and #5 are commonly used size designations for pouches. A #3 is lighter and flatter; a #5 can provide a more substantial feel for a heavier or more frequently used pouch.
- Slider type: Auto-lock sliders stay where you stop them. Non-lock sliders can drift open under pressure from an overpacked pouch.
- Puller design: Standard pullers, branded rubber pullers, cord-loop pullers or custom metal pullers all affect the look, feel and cost.
- Zipper path: Straight across the top, L-shaped (two-side opening), or full clamshell (three-side opening). A clamshell layout makes it easy to see all contents at once and can suit a multi-item organizer, but it requires more zipper length and a precise sewing path around corners.
- Zipper-end reinforcement: Bar tacks or metal stops at each end of the zipper prevent the slider from running off the track. These should be tested on the sample with realistic packing pressure.
Decision: Match the closure type to the access frequency and brand positioning. For daily-use branded tech kit packaging, a smooth nylon coil zipper in #5 gauge with an auto-lock slider is a common starting point — but confirm the specific gauge, slider and puller options with the supplier.
—
How Should Buyers Decide Between a Single Pouch and a Complete Tech Kit?
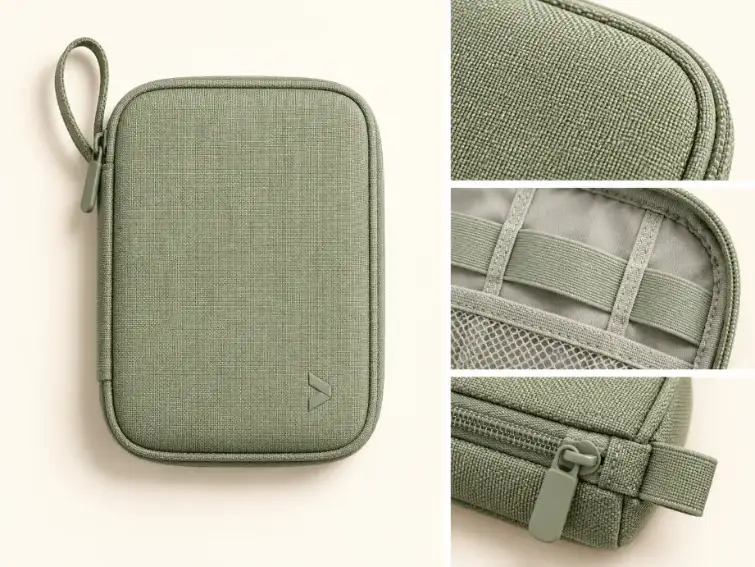
Many cable pouch projects start as a single-SKU request and later evolve into a multi-piece tech kit — a set of coordinated pouches sold together, bundled with a product, or assembled as a corporate gift. This decision changes everything: packaging design, SKU management, shipping volume, cost structure and branding approach.
Single pouch: when it makes sense
A standalone custom cable pouch is the right format when:
- The pouch is an accessory sold with a single product (e.g., included in the box with a laptop or monitor).
- The pouch serves as a branded merchandise item or promotional giveaway with a focused purpose.
- The buyer wants to test the market before committing to a multi-piece set.
- Budget or MOQ constraints make a kit impractical for the first order.
Multi-piece tech kit: when it makes sense
A branded tech kit packaging set is the right format when:
- The brand sells a curated collection of tech accessories and wants coordinated packaging across all items.
- The product is a corporate gift or employee welcome kit where presentation matters.
- The e-commerce listing benefits from a “set” format that increases perceived value and average order value.
- Different items in the kit have genuinely different protection or organization needs (e.g., a padded pouch for a power bank, a mesh pouch for cables, a small zip pouch for adapters).
Kit assembly considerations
If the project is a multi-piece kit, procurement teams need to define:
- How many pieces in the set? Two-piece, three-piece and five-piece sets are common. Each additional piece multiplies the SKU count, quality-check steps and packing labor.
- Are all pieces the same material and color? Coordinated kits typically use matching fabric and branding across all pieces, which simplifies sourcing but requires the factory to hold consistent dye lots across different pouch sizes.
- Does the kit include an outer case or sleeve? Some tech kits are packed inside a larger travel pouch or rigid box. This outer container needs its own specification.
- How is the kit packed for shipping? Individual poly bags per piece, all pieces in one poly bag, or assembled in the outer case? The packing method affects the carton volume and shipping cost.
- Is the kit sold as a fixed set or mix-and-match? Fixed sets are simpler to produce and pack. Mix-and-match sets (where the customer chooses two from five options) require a different inventory and fulfillment strategy.
If you are sourcing coordinated fabric packaging for travel purposes, the specification logic for custom packing cubes follows a similar structure and may help you frame the brief for a multi-piece tech kit.
Decision: Decide the format — single pouch or kit — before requesting a quote. Combining separately quoted items later can add packing, handling or outer-packaging cost compared with a kit planned and quoted as a set; confirm the difference on comparable specifications.
—
Customization and Cost Drivers to Confirm
Customization can affect unit cost, setup cost or MOQ. Identify the major drivers before quoting to set a realistic budget and avoid redesign after the first quote.
Material selection
The outer shell fabric is often a major material cost driver. Common options for custom tech accessory pouches include:
- Polyester (various deniers): Durable, easy to print on, wide color range. A workhorse fabric for tech accessories.
- Nylon (ripstop or plain weave): Lighter weight and higher tear resistance than polyester at the same denier. Often used for premium or outdoor-positioned products.
- Canvas (cotton or cotton-poly blend): Heavier hand feel, natural aesthetic. Takes screen printing well. Less water-resistant than synthetics unless treated.
- Neoprene: Stretchy, padded, modern look. Adds bulk but provides cushioning without a separate padding layer. Higher material cost.
- TPU-coated or laminated fabrics: Provide water resistance. The lamination step adds cost and may limit branding method options.
Branding methods
Logo application is another important cost driver. Common methods for cable pouches include:
- Screen printing: Cost-effective for one- or two-color logos on flat surfaces. Setup requires a screen per color.
- Heat transfer: Suitable for multi-color or photographic logos. Good detail reproduction on smooth synthetic fabrics.
- Debossing or embossing: Creates a subtle, premium tone-on-tone effect. Works on thicker materials. Requires a metal die.
- Woven or printed labels: Sewn into a seam or applied to the exterior. Lower per-unit impact than direct printing, but a common and effective option for brand identification.
- Embroidery: Durable and perceived as high-quality. Limited in fine detail; thread color count affects cost.
For a detailed comparison of logo techniques and their cost structures, the YJXPACK guide on screen printing vs heat transfer vs embroidery covers the trade-offs relevant to fabric pouch projects.
Other cost variables
Beyond material and branding, the following specification choices each move the unit cost:
- Number and type of compartments: More compartments = more sewing time and materials.
- Zipper brand and type: A standard unbranded nylon zipper is the baseline. Branded zippers, metal zippers, water-resistant zippers and custom pullers each add cost.
- Lining: An unlined pouch is cheaper than a lined one. A contrasting-color lining adds visual appeal but requires a second fabric and additional sewing.
- Padding: Foam or wadding layers between the shell and lining increase material cost and sewing complexity.
- Hardware: D-rings, carabiner clips, key hooks or strap attachments for mounting the pouch to a bag add metal hardware and assembly steps.
- Packaging: A custom cable pouch packed in a branded box or sleeve costs more than one packed in a plain poly bag. The outer packaging may need its own artwork and specification.
- Order quantity: Higher volumes may reduce the unit cost through material purchasing, setup amortization and production efficiency.
Decision: Rank the customization features by importance to the brand and the end user. Identify which features are non-negotiable and which can flex to meet budget. Share this priority ranking with the supplier so the quote reflects realistic options rather than a maximum-specification price.
—
Sampling, Quality Checks and the Final Supplier Question List
Before mass production, request a physical sample approved with the actual contents packed inside. A flat, empty pouch can look right while still failing to close, retain contents or keep its intended shape when loaded.
What to check on the sample
Evaluate the sample against the full contents inventory, not just visually. Key checkpoints:
- Pack the pouch with every item from the contents inventory. Cycle the zipper repeatedly under the intended load. Does it run smoothly, and does the slider hold when applicable?
- Check elastic loop tension. Insert the actual cable or charger. Turn the pouch upside down and shake gently. Does the item stay in place?
- Measure the packed dimensions. Will the packed pouch fit inside the intended outer packaging, laptop bag pocket or shipping carton?
- Inspect stitching at stress points. Check corners, zipper ends, elastic loop anchors and compartment divider seams for loose threads, uneven tension or visible distortion.
- Verify branding position and quality. Check that the logo is correctly placed relative to the zipper, that print or embroidery is sharp, and that colors match the approved reference.
- Assess the fabric hand and weight. Does the material feel consistent with the brand’s positioning? Is it stiff enough to hold its shape when empty, or does it collapse?
The supplier question list
Before finalizing the sample and moving to production, compile a question list that covers every open item. The following checklist is a starting framework — adapt it to the specific project:
Product specification:
– Can the factory produce the compartment layout shown in the flat sketch?
– What zipper gauges, slider types and puller options are available?
– What fabric weights and finishes are available for the shell and lining?
– Can the factory provide a padded version if the brief requires it?
– Is the closure type confirmed as feasible at the quoted price?
Branding and artwork:
– Which logo methods are available on the proposed shell fabric?
– What is the maximum logo size and color count for the selected method?
– Can the proposed fabric and logo colors be matched to the supplied color reference, and how will the acceptable tolerance be confirmed?
– Can the factory produce a branded zipper puller, and what is the impact on cost and lead time?
Production and logistics:
– What is the MOQ for this specific design?
– What is the standard lead time from sample approval to shipment?
– How are production samples (pre-production and inline) handled?
– What quality-check protocol does the factory follow for zipper function and stitching durability?
– How are pouches packed for shipping — individually bagged, bulk-packed, or packed in sets?
Compliance and documentation:
– What material safety or compliance documentation can the factory provide upon request?
– Can the factory supply fabric composition and weight certificates?
Not every question will apply to every project, but omitting a relevant one often means discovering the gap after production has started.
—
Next Step
A well-defined brief is the fastest path to an accurate quote and a useful sample. Before reaching out to a cable storage pouch supplier, prepare the contents inventory with measurements, the compartment layout sketch, the closure preference and the single-pouch-versus-kit decision. These four inputs shape every downstream choice — material, cost, branding and production timeline.
Contact YJXPACK with your completed brief to request material options, a compartment-feasibility review and sample pricing for your custom cable pouch project.
Frequently Asked Questions
Can a single cable pouch design work for different cable sets?
It depends on the range of contents. A pouch with flexible compartments — mesh pockets and a few elastic loops rather than rigid molded slots — can accommodate cables and chargers of varying sizes. However, if the cable sets differ significantly (e.g., one includes a laptop charger brick and the other does not), a single design will either be too large for the small set or too tight for the large set. In that case, two pouch sizes or a modular kit is a better approach.
What happens if the cables change between generations?
Consumer electronics brands update cable types, charger sizes and connector formats regularly. If the custom cable pouch is sold alongside a product that may change, design the compartments for the general size category rather than the exact item. Elastic loops with moderate stretch and mesh pockets with some depth tolerance handle generational changes better than precision-cut foam inserts.
Is a clamshell (book-style) pouch always better than a top-zip pouch?
A clamshell pouch opens flat, making it easy to see and access every item. It can suit multi-cable kits and branded tech organizer pouches. However, it uses more zipper, requires more sewing and lies thicker when packed. A simple top-zip pouch can cost less, pack slimmer and work well for single-purpose storage — for example, a pouch that holds only one charger and one cable. Choose based on the contents count and the access pattern, not on assumption.
How do buyers handle color matching across a multi-piece kit?
When a kit includes two or three different pouch sizes in the same fabric and color, dye-lot consistency becomes critical. Request that all pieces in a kit be cut from the same dye lot. If the kit includes different materials (e.g., a nylon pouch and a mesh pouch), exact color matching across material types is difficult — confirm the acceptable tolerance on a physical sample set before approving production.
Should the cable pouch include a hanging loop or clip attachment?
A hanging loop, D-ring or carabiner clip allows the pouch to be attached to a backpack, luggage handle or hook. It can suit travel-positioned products and corporate travel kits. It adds hardware and a reinforced attachment point, so confirm its cost and construction before sampling; adding it after the pattern is finalized may require a new sample round.
Share This Story, Choose Your Platform!